

Easy Needlepoint Projects for Beginners
Table of Contents
- Easy Needlepoint Projects for Beginners: Where to Start
- Essential Needlepoint Supplies for Beginners
- Best Needlepoint Stitches for Beginners
- How Long Does a Needlepoint Project Take
- Five Easy Needlepoint Projects to Build Your Skills
- How to Read a Needlepoint Chart and Start Your First Project
- Kits vs. Supplies: Finding What Works for You
- Frequently Asked Questions
Last Updated: September 30, 2026
Easy Needlepoint Projects for Beginners: Where to Start
Starting needlepoint doesn't require years of experience or expensive supplies. The real barrier is choosing a project that won't frustrate you before your first stitch. Easy needlepoint projects for beginners exist because the craft rewards patience, not perfection.
Most beginners quit because they chose the wrong first project. A 20-inch pillow cover feels insurmountable; a coaster is manageable. That shift from "I'll never finish this" to "I completed something" changes everything.
This guide covers essential supplies, core stitches, and five projects that build skills without intimidation. We'll show you how to start small and build confidence.
Essential Needlepoint Supplies for Beginners
You need surprisingly little to start. Here's what matters.
Canvas Types and Mesh Sizes
Needlepoint canvas comes in different densities, measured in mesh count (holes per inch).
Mono canvas is the standard for beginners, a single layer woven in a grid, forgiving and widely available. Interlock canvas is more stable but stiffer. Start with mono.
Start with 14-count or 16-count mesh. These sizes let you see stitches clearly without magnification and finish in reasonable time. 10-count works if you prefer speed over detail.
Hand-painted canvases have designs printed on them, guiding stitch placement, easier for beginners. Counted canvases require following a chart, demanding more precision but offering more design flexibility.
Thread and Fiber Options
Wool yarn is best for beginners, forgiving, textured, and resistant to fraying. Persian wool (three strands twisted together) lets you adjust thickness for different canvas sizes.
Silk thread produces stunning results but is slippery, expensive, and frustrating for beginners. Skip it.
Cotton embroidery floss splits easily and feels less satisfying. It's cheaper but steeper to learn.
For your first project, invest in quality wool. It makes the process more enjoyable, and you'll actually want to pick it up again.
Needles, Frames, and Finishing Tools
Tapestry needles are blunt-tipped and sized to match canvas mesh. Size 18 or 20 works for 14-16 count canvas. The blunt tip prevents splitting existing threads.
Stretcher bars or a needlepoint frame keep canvas taut. Tension matters, loose canvas leads to uneven stitches. Stretcher bars are inexpensive and improve stitch quality significantly.
Binding tape finishes edges and prevents fraying. Backing fabric reinforces durability. Both matter for items that get actual use.
Best Needlepoint Stitches for Beginners
Three stitches handle 90% of beginner projects.
Tent Stitch: The Foundation
The tent stitch is the foundation, small diagonal stitches covering one canvas intersection. It's simple and produces clean coverage.
Two variations exist: continental stitch (left-to-right rows) and basketweave stitch (diagonal). Continental is easier to learn; basketweave prevents canvas distortion on larger projects.
Work tent stitches at a consistent angle, always slanting lower-left to upper-right. Inconsistent angles make finished pieces look uneven. This is the most common beginner mistake.
Basketweave Stitch: Durability Without Distortion
Basketweave stitch looks like tent stitch from the front but works diagonally. It distributes tension evenly, preventing canvas from pulling into a diamond shape.
The learning curve is steeper, but once you understand the pattern, it becomes automatic. For projects larger than a bookmark, basketweave is worth the effort.
Continental Stitch: Speed and Simplicity
Continental stitch is tent stitch in horizontal rows. It's fastest and easiest to learn. The tradeoff: on large projects, canvas pulls into a diamond shape due to uneven tension distribution.
For small projects (coasters, bookmarks, ornaments), continental stitch is perfect. You'll finish faster and stay motivated. Save basketweave for larger projects.
How Long Does a Needlepoint Project Take
Small projects (coasters, bookmarks, ornaments) take 5-15 hours. A coaster might take 4-6 sessions at 1-3 hours per session.
Medium projects (eyeglass cases, small pillows) take 20-40 hours, roughly a month of casual stitching.
Larger projects (full pillows, wall hangings) take 100+ hours. These are commitment projects, not starters.
Speed depends on mesh count, stitch type, and experience. Beginners are slower, that's normal. You'll naturally speed up.
Five Easy Needlepoint Projects to Build Your Skills
These projects teach you real skills while producing finished items you'll actually use or gift.
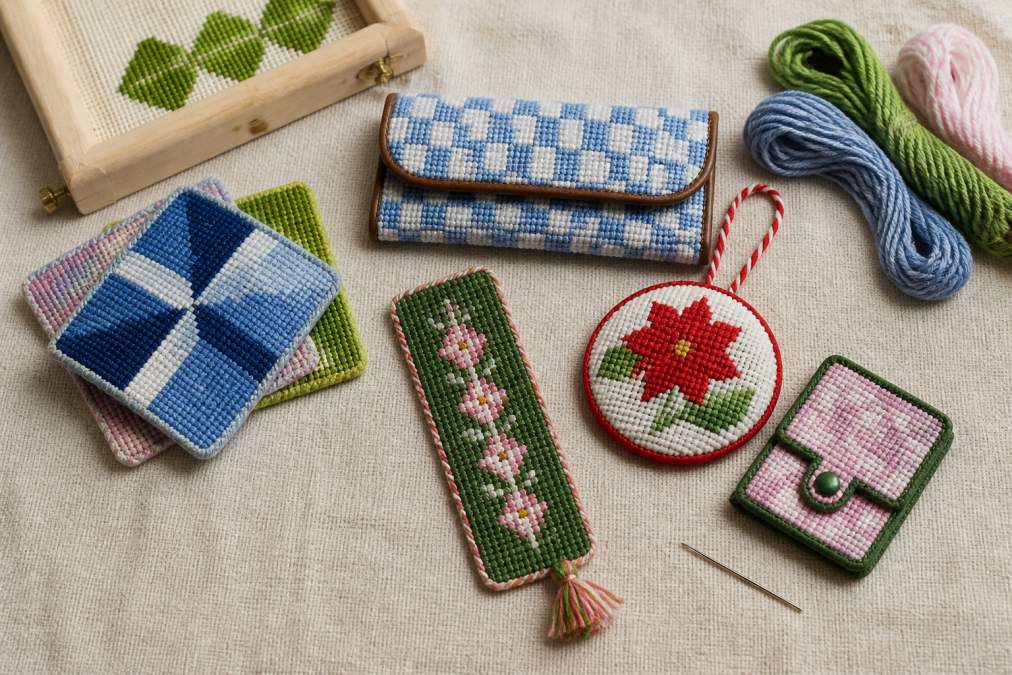
1. Needlepoint Coasters
Coasters are the perfect first project, small (4x4 inches), quick to stitch, and genuinely useful.
A coaster teaches tension, consistency, and finishing without overwhelming you. Complete one in a weekend or spread it across weeks. The finished piece is durable and real.
Start with a 14-count mono canvas coaster kit. Choose a simple geometric or hand-painted design. Stitch in continental stitch with wool yarn. Finish with binding tape.
If you mess up, it's just a coaster. Low stakes make mistakes feel like learning.
2. Eyeglass Cases
An eyeglass case is slightly more involved, roughly 3x6 inches with folding and backing that teach finishing techniques.
You'll use tent stitch and work within a specific shape, building accuracy. Finished cases are genuinely useful gifts.
Choose a simple pattern with clear color changes. Stitch, back with fabric, and add binding tape for a polished finish.
3. Bookmarks
Bookmarks are long and narrow (usually 2x8 inches), which teaches you to maintain tension over a vertical distance. They're quick to stitch and useful.
A bookmark is where you can experiment with simple decorative stitches beyond tent stitch. Add a small cross stitch accent or a row of backstitch detail. These small embellishments teach you that needlepoint is flexible, you're not locked into one stitch.
Finish with binding tape or a simple fold. Add a tassel at the bottom if you want to get fancy.
4. Small Ornaments
Ornaments are seasonal, which makes them feel special. They're also small enough to finish quickly, giving you a sense of accomplishment.
A typical needlepoint ornament is 2-3 inches and gets backed with felt or cardstock, then hung with ribbon. You'll learn backing and assembly without the complexity of larger projects.
The ornament teaches you that needlepoint isn't just functional, it's decorative.
5. Needle Cases
A needle case is a small zippered pouch (roughly 3x4 inches) that holds your needles and thread. It's practical and teaches you structure.
How to Read a Needlepoint Chart and Start Your First Project
Charts guide counted needlepoint, where you follow a pattern rather than working on a hand-painted canvas. This is where needlepoint gets flexible.
Understanding Pattern Legends
A needlepoint chart is a grid where each square represents one canvas intersection. Different symbols or colors represent different thread colors. The legend tells you which symbol means which color.
Securing Your Thread and Maintaining Tension
Thread management separates beginners from experienced stitchers. A loose thread unravels your work. Too-tight tension distorts your canvas.
Common Mistakes to Avoid
Inconsistent stitch angles ruin finished pieces. Every stitch should slant the same direction. Check your work frequently.
Kits vs. Supplies: Finding What Works for You
You have two paths: buy a kit with everything included, or source supplies separately.
| Option | Best For | Cost | Includes |
|---|---|---|---|
| Complete Kit | Beginners wanting no decisions | Higher per-project | Canvas, thread, needle, instructions |
| Hand-Painted Canvas | Visual learners | Medium | Pre-designed canvas, requires sourcing thread |
| Separate Supplies | Experienced crafters or multi-project planners | Lower overall | Canvas, thread, needle sourced individually |
| Local Community Retailer | Support and guidance | Medium | Supplies plus access to classes and feedback |
Frequently Asked Questions
What is the easiest needlepoint stitch for a beginner?
The tent stitch is the easiest and most forgiving stitch to learn. It creates a diagonal pattern across the canvas mesh and works well for filling backgrounds and simple designs. Once you master tent stitch, you'll have the foundation to learn basketweave and continental stitches. Most beginners spend their first few projects perfecting tent stitch before exploring other needlepoint stitches.
What needlepoint supplies for beginners do I actually need to start?
At minimum, you need a needlepoint canvas (18-22 mesh count is ideal for beginners), embroidery floss or wool yarn, a tapestry needle, stretcher bars or a frame to hold tension, and a stitch guide. A beginner-friendly kit includes all these items together, removing the guesswork. Many beginners find kits reduce frustration because materials are pre-selected to work well together.
How long does a needlepoint project take for a beginner?
Small projects like coasters or bookmarks typically take 5-15 hours of stitching time, depending on complexity and your speed. A 4x6-inch canvas might take 8-12 hours spread across several weeks of casual stitching. Most beginners work 1-3 hours per session, so expect 2-6 weeks to complete a small project. Larger pieces naturally take longer, but starting small keeps you motivated.
Is needlepointing an expensive hobby to start?
You can start needlepointing affordably. Beginner kits range from budget-friendly options that include all essentials to premium hand-painted canvases. The initial investment covers canvas, thread, and tools you'll use across multiple projects. Many stitchers find the cost per project decreases over time as they build a supply collection. Starting with one small kit is the most economical way to test whether you enjoy the craft.
Can I really finish an easy needlepoint project in a few weeks?
Yes. Small projects like coasters, eyeglass cases, or bookmarks are designed to be completed quickly, often in 2-4 weeks of casual stitching. These projects use simple stitches, require minimal thread changes, and fit small canvases. Finishing quickly builds confidence and momentum. Once you complete your first project, you'll understand your own pace and can choose appropriately sized projects going forward.